Document Camera Alternatives for Google Meet
When meeting with your class via Google Meet, you may find yourself wanting to use a secondary camera as you would use a document camera in the classroom. Detailed below are a few options on how to accomplish this depending on what materials you have available.
iPad camera via Quicktime

Materials Required:
- Lightning to USB cable
- iPad with Meet app installed
- MacBook (QuickTime should already be in the Applications folder)
- *Optional iPad Doc Cam Stand
1) Using the lightning cable, plug your iPad into your laptop tap the option to ‘Trust this Computer’
2) On your Mac, open QuickTime by finding the app in your applications folder, or by searching for it with the magnifying glass.
Note: a new window will not appear, but you should see QuickTime appear in your dock and in your menu bar.
3) Go to File in the menu bar and click "new movie recording." Note: you will not be recording anything.

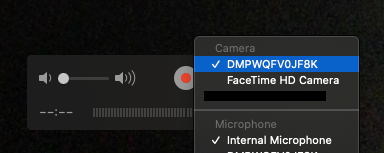
4) From the down arrow in the recording control box*, select your iPad. Your iPad may just be named with a serial number. Once selected you should see your iPad screen mirrored in quicktime.

5) Now you can 'present' the QuickTime window in Google Meet!
*If you continue to see the gray box with recording controls, move the mouse away from the QuickTime window and it should disappear.
iPad camera via Apple TV and QuickTime (Apple TV Required)
This option is bandwidth intensive!
1) Make sure your Apple TV is plugged in to power and joined to the same network as your Mac and iPad.
2) Mirror your iPad to the Apple TV by pulling the airplay menu down from the iPads top right corner.
3) On your Mac, open QuickTime by finding the app in your applications folder, or by searching for it with the magnifying glass.
Note: a new window will not appear, but you should see QuickTime appear in your dock and in your menu bar.
4) Go to File in the menu bar and click "new movie recording." Note: you will not be recording anything.
5) From the down arrow in the recording control box*, select your Apple TV. Once selected you should see your Apple TV screen mirrored in QuickTime.
iPad via AirServer (Software License Required):
This option is bandwidth intensive!
1) Mirror your iPad screen on your computer using AirServer or Reflector.
2) Once your iPad is displaying on the computer screen, open the camera app on your iPad.
3) You can now use google meets to present your Reflector or AirServer window.
Personal Smartphone or iPad Joined to Google Meet
Materials Required:
- Smartphone with Meet app installed
- Other device running meet with teacher facing camera
- *Optional Smartphone Doc Cam Stand
1) Make sure the Google Meet app is downloaded on your phone and the phone is connected to WiFi
2) Create a Meet and join on your computer.
3) Open Meet on your phone and join using the join code.
4) Mute the phone‘s mic and turn off the speaker volume to avoid feedback issues.
5) ‘Present’ using our phone to allow the class to see what you’re doing.
Specific Document Camera models via USB and QuickTime:
Only specific Models of Doc Cam will connect to our MacBooks, Please make sure yours qualifies before trying this option.
Materials Required:
- Mac Computer (macOS 10.14 or higher)
- USB Cable (type is dependent on Document Camera model)
-
Specific document camera model as detailed below.
Vetted Document Cameras:
F15, F17, 300AF+
WILL NOT WORK:
CP300, CP155
1) Open QuickTime from the applications folder or by searching for it.
2) Select file in the top menu bar, and select ‘New movie recording.’ Note: You will not be recording anything.
3) From the down arrow in the recording control box* select 'Aver USB Camera.' You should now see the video from your Doc Cam in QuickTime.
4) Now you can present the QuickTime window in Google Meet!
*If you continue to see the gray box with recording controls, move the mouse away from the QuickTime window and it should disappear.