Running Reports
How to run reports in TeacherVUE for your class. Includes information on changing report parameters prior to execution.
Contents
- Printing reports for your whole class
- Changing report settings
- Printing reports for an individual student
Printing Reports for your Whole Class
1. Sign in to your class in TeacherVUE.
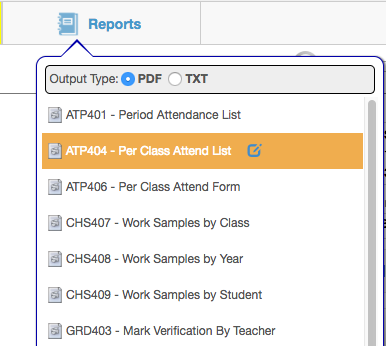
2. Move your mouse over the "Reports" button. A menu of available reports will appear. Elementary and secondary teachers will have different report options.

3. Most teachers should leave the “output type” selection on “PDF.” If you want to import the report data into a spreadsheet, select “TXT.”
4. Click on the name of the report you want. PDF reports will open either in a new browser window or in your computer's PDF reader.
5. If you selected “TXT” for your output type, you may be prompted to save the file or it may display on the screen. Downloaded files will go to your web browser’s default download location on your computer. Import this file into your favorite spreadsheet or database program. If the report displays on your web browser screen, you can copy & paste the contents into your preferred text editor.
Changing Report Settings
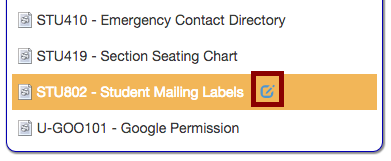
Synergy now offers the ability to modify report parameters before running the report. This section will show you the basics of setting report parameters before printing the report. We will use the "STU802 - Student Mailing Labels" report as an example.
1. In the "Reports" menu, you will now notice a small pencil icon when you mouse over each report.
- Clicking on the report name will run the report as normal with the default settings.
- Clicking on the pencil icon will open the report interface for making changes.

2. After clicking the pencil icon, you will see the report interface. On the main tab, you can change your report parameters.* For example, you could change the "Student Name Format" pulldown to "First MI. Last" to display in natural order or only check the "Show Parent Name" box so the student name is not included on the printout.
The available options will change from report to report. An attendance report would have a field for selecting dates, but would not include label formatting options for example. Your best bet is to try the different options for each report to learn what they do.
Note: since these reports are also accessed by secretarial and administrative staff that have access to the entire school, you will see options that are not relevant to you as a classroom teacher. Selecting options that you don't have access to (a different grade or teacher for example) will likely cause the report to fail with a "no data found" message. The report may run successfully, but revert to showing you information for your current class instead of reflecting your erroneous selections.
3. Click on the "Print" button to run your report. If you would like your selections to be the default for the report, click the "Save Default" button. Please do not use the "Email Me" button as we do not transmit student data via email.
4. Close the report interface window when done.
Printing Reports for an Individual Student
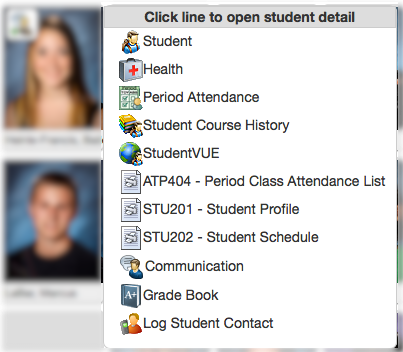
1. On your seating chart, click on the picture of the student you want a report for. A menu for accessing student information, including reports, will appear.
2. Click on the report you want. Note: Elementary and secondary teachers will have different report options.

3. You can change report settings (as described above) by clicking on the pencil icon after the report name.