Introduction
Middle and high school teachers will receive new course cards/sections at the change from Semester 1 to Semester 2. Students are automatically rostered.
-
Teachers will see new course cards 7 days before Semester 2 begins.
-
Teachers will still be able to view their past course content (all courses → Past Enrollments)
-
Students will not see the new course cards until the calendar day before Semester 2 begins. Students will have access through midnight the Sunday after the semester ends.
-
Students will see their previous term courses in Courses → All Courses → Past Enrollments.
Once you have your new Semester 2 course cards, you will need to adjust their settings and, if appropriate, bring over whatever content you want from your Semester 1 courses.
Course/Section Names
- Canvas course cards & sections will include the course name, teacher name, and term. Example Math 7-P03-Engstrom-S2
- For the first two weeks of each semester, you will be able to edit your course name to remove the period information (instructions)
Migrating Content
Important: If you are migrating content that used the 'Google Drive Cloud Assignment' external tool submission type, you will need to edit these assignments and select the 'Google Assignments (LTI 1.3)' external tool submission type. (instructions) 'Google Assignments (LTI 1.3)' now supports SpeedGrader!
For Edpuzzle Users: According to EdPuzzle support. "Edpuzzle doesn't consistently recognize copies within an LMS, which is why we say in our videos and articles that assignments should never be copied or reused."
If you teach more than one section of the S2 course, cross-list those sections into your primary course (instructions) before proceeding.
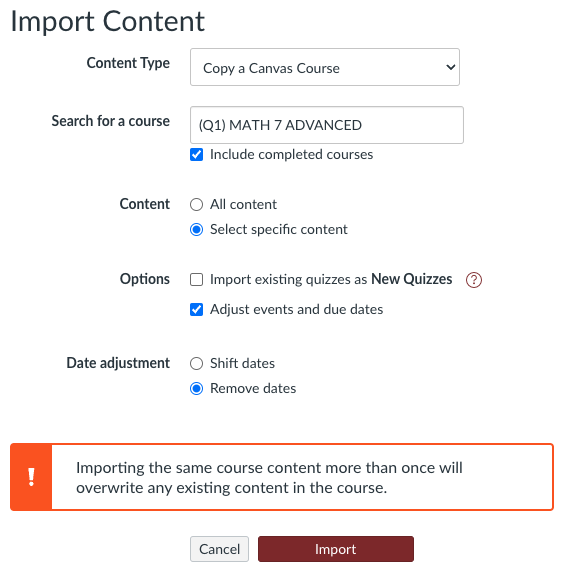
From your NEW course home screen, click the "Import Existing Content" button on the right.

In the "Content Type" pulldown menu, select "Copy a Canvas Course"
In the "Search for a course" field, search for and select the previous course. You Can do this by name (Example: Math 7 -Engstrom-S1) or course ID number Example: 36829)
Click the "Select specific content" radio button so you can choose the content you want to bring over. Important: Be sure to remove or shift the assignment dates. If you don't you will run into grade passback sync issues and any late policies you have in place will be applied as soon as you import.
Click "Import"

-
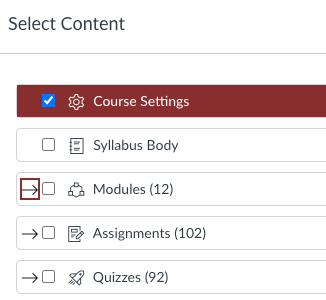
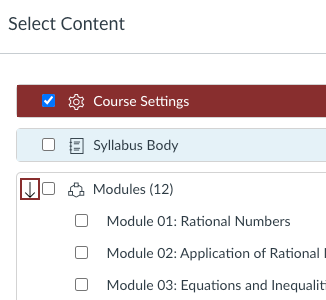
In the "Current Jobs" area, click "Select Content" and then choose the content you want to bring over from the previous course: Settings, modules, pages, rubrics, etc. Click the → to select individual items in that area. Be sure to select "Pages" to get your course home page.

 Checking these boxes will bring in ALL content in that area.
Modules area expanded so individual modules can be selected.
-
Important Notes:
Be sure to select "Content Settings" to save some setup time.
You don't need to select the individual assignments, quizzes, files associated with a module. Selecting a module will also import any associated resources it needs.
When done, click "Select Content." You will see a progress bar. If you don't see your content right away don't panic, and don't repeat the import process again. You will likely create duplicates.


-
After import is complete, go to your course and do the following:
Assignments → Set up assignment groups if you use them and adjust/disable assignment groups weighting. Publish/unpublish assignments as desired.
Note: assignments you brought over from the previous term will be in the "Imported Assignments" group which, if you are doing assignment groups weighting may impact the students' grades. You can drag them to a different group if necessary.
Settings → Course Details: Choose your course image. Click "Update Course Details" at the bottom of the page.
Settings → Navigation: adjust as desired, but make sure that "Grade Sync" is visible.
- On the "Pages" screen, set your home page. (Pages → View All Pages →
 → Use as Front Page)
When you are done, return to the course home screen and publish your course. Note: Doing this will replace the district start date with the current date =time and give students access, so be sure to do the last step below.
Important: Settings → Course Details → Participation: Set the pulldown menu to "Term." Click "Update Course Details" at the bottom of the page. Now students will not be able to see the course until the calendar day before the new term starts.